|
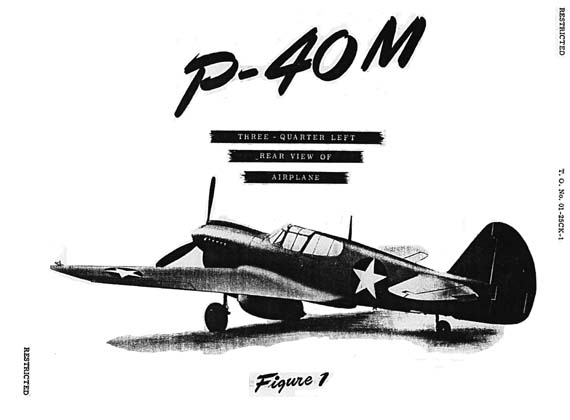
Length |
33 ft 3-23/32 in. |
|
Height, taxiing position |
10 ft 8 in |
|
Span |
37 ft 3-1/2 in. |
b. Access to Airplane. - Access to the airplane is gained through the canopy over the pilot's cockpit. The canopy is held shut by a friction grip, and it may be opened by placing one hand on each side of the canopy and giving it a sudden backward push.
c. Fuel, Oil, and Coolant.
(2) Oil: Specification No. AN-VV-0-446
Winter - 1100
(3) Coolant: Ethylene glycol.
|
|
 |
|
|
 |
|
|
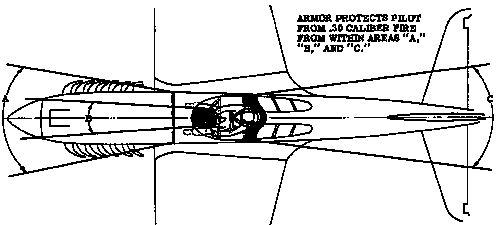
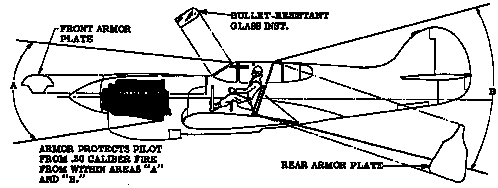
- 3/8-inch plate forward of instrument panel at station No. 2A.
5/16 -inch plate covering bulkhead at station No. 5.
5/16-inch plate forward side of armor plate at station number 5, aft of pilot's headrest.
e. Mooring Provisions. - Tie-down rings are located under surface of each wing near the wing tip. They are held in a retracted position in the wing by springs and can be pulled down through slots by small tabs which protrude through the bottom surface of the wing. A towing ring on the inboard end of each landing wheel axle can also be used for tie-down purposes.
f. Fuel System (See figure 15.)
g. Oil System (See figure 13.)
h. Cooling System. (See figure 12.)
i. Hydraulic System. (See figure 14.)
(2) Aileron and Elevator. - Conventional stick, equipped with a thumb-operated hydraulic system off-on button on the top of the grip (figure 10), and a squeeze type machine gun trigger lever on the front side of the grip.
(3) Rudder Control. - Conventional pedals and toe-operated brakes. Each rudder pedal may be adjusted to desirable length by first pushing inboard on the spring-loaded adjustment lock which permits the pedal to float free on its hinge. After moving pedal to desired location, release lock and "juggle" pedal slightly to allow locking pin to snap into position. ALWAYS ADJUST BOTH PEDALS TO THE SAME LENGTH.
(4) Elevator Trim Tab Control. - The trim tab is actuated by a round control knob (figure 7) on the left side of the cockpit. The knob has calibration marks around its outer circumference. Rotating the knob clockwise (forward) puts the airplane nose down.
(5) Rudder Trim Tab Control. - The rudder tab Is actuated by a round control nob (figure 7) on the left side of the cockpit. Rotating it to the left (counter - clockwise) turns the nose of the airplane to the left.
(6) Aileron Trim Tab Control. - The aileron trim tab is electrically controlled. When the switch (figure 7) Is pushed right, the left wing raises, and when the switch is pushed left, the left wing lowers. The switch returns to a neutral "OFF" position when released, allowing trim tab to remain as adjusted.
(7) Landing Gear and Tail Wheel. - Hydraulically actuated with provisions for automatic power or hand operation.
2. On P-40M airplanes, AF-43-5723 and up, the wheel position indicator consists of a yellow peg which raises directly above the oleo strut hinge on both right and left landing gears when the gear is down. The warning horn is replaced on these planes by a warning light, located in the upper left part of the instrument panel. The light will function if the wheels are not locked down when-the throttle is closed.
(b) Gear Dow . - The landing gear may be lowered (WHEN THE IAS IS 175 mph OR LESS) by pulling the safety latch bolt (if installed) on the landing gear lever (figure 7) forward, and lowering the handle to its "DOWN" position. Pull the hydraulic control switch trigger below the control stick grip ( figure 10), until a few seconds after the indicator shows the gear to be down and locked in place. As a final check, operate the hand pump (figure 10) and if a high pressure is required to move it, the gear is down. If the landing gear warning horn fails to sound, or the landing gear warning light fails to go on depending on which is installed) when the throttle lever (figure 8) is closed, the landing gear locks are definitely in place. RETURN THE CONTROL LEVER (figure7) TO "NEUTRAL." The safety latch bolt (if installed) prevents the accidental raising of the handle beyond the neutral position.
(c) Gear Up The gear may be raised at any speed. Pull the safety latch bolt on the landing gear control lever (figure 7)forward (if installed) and raise the handle to its "UP" position. Pull the hydraulic switch trigger (figure 10) below the control stick grip until the indicator shows the gear completely up. RETURN CONTROL HANDLE (figure 7) TO "NEUTRAL" AFTER GEAR IS RETRACTED.
(d) Emergency Operation. - If the hydraulic switch trigger fails to operate the landing gear, manually operate the auxiliary hand pump. (See figure 10.) If this fails to operate the gear, manually operate the emergency hand pump, (if installed). (See figure 10.) When the emergency system is used to lower the landing gear, a "tail high" landing must be made, because the emergency system does not operate the tail wheel.
(8) Wing Flap Operation. - Hydraulically actuated with provisions for automatic power or emergency hand operation.
(b) Flaps Up - Move flap control lever to UP position. Pull trigger at the base of control stick grip until a few seconds after indicator on instrument panel shows flaps are retracted. RETURN FLAP CONTROL LEVER TO "NEUTRAL" AFTER RETRACTION. NOTE: The flaps may be placed in any intermediate position by releasing the trigger on the control stick when the flap position indicator shows the desired deflection.
(10) Warning Horn Disconnect Switch. - Pull out the cam on the throttle rod to disconnect the switch temporarily. Automatic engagement of the switch results the next time the throttle is opened to its stop, placing the warning horn back in operation.
(11) Heating and Ventilation Control. - Pull the control (figure 10) for heat push for cold. The control may be set for any intermediate position. Closing the radiator shutters increases the temperature of the air coming into the cockpit.
(12) Fuel Tank Gages. - Gages are direct visual reading gages. It is not necessary to operate any switch to place them in operation.
(13) Fuel Selector Valve. - Conventional. (See figure 8.) CAUTION: Do not turn pointer through "BELLY" when the belly tank is not installed.
(14) Radiator Shutter Control. - move the control (figure 10) up to close and down to open the shutters. Set as the coolant and outside temperatures require. This control is equipped with an Index finger release lock which must be operated bef ore Me shutter control can be moved. The coolant temperature warning lamp (figure 6) can be tested by operating the small test switch. (See figure 5.) CAUTION: Do not extend radiator shutters at indicated air speeds in excess of 175 mph.
(15) Parking Brake. - The parking brake lever (figure 6) will lock the wheels if pulled when the toe brakes are depressed. The parking brake will release automatically by pressing on the toe brakes.
(16) Lights
2. A cockpit spotlight (figure 7) is located on each side of the cockpit, and both are controlled by a switch (figure 5) on the central control panel.
3. The brilliancy of the compass light and the gun sight may be regulated by turning the two rheostat controls (figure 5) in the middle of the control panel.
(b) Landing Light. - After the switch (figure 5) has been turned on, the light will not glow until after the landing light mechanism has extended the lamp to its operating position. Do not operate the landing light at speeds in excess of 175 mph. The switch (figure 5) has three positions: up and down for "ON" and neutral for "OFF." When the switch is placed in the upper "ON" position, the landing light swings down and out of the left wing. The light automatically illuminates after passing the center line of the pivot. When the switch is placed in the lower "ON" position, the landing light retracts up into the wing and is automatically turned off.
- CAUTION: Do not test operate the light for more than 5 seconds. Do not operate the light for more than 3 minutes.
(17) Windshield Defroster Control. - The glycol spray pump must be operated by hand to force the liquid onto the windshield.
(18) Coolant and Fuel Pressure Test Switch. -The switch (figure 5) is a double -throw, momentary contact, toggle switch with two "ON" positions and a neutral "OFF" position. The coolant test "ON" position is the upper "ON" position, and the fuel pressure test "ON" position is the lower.
(19) Pilot's Shoulder Strap Adjustment. - The locking pin handle may be placed in the locked or unlocked position by pressing the button on its top and moving it fore and aft. When the handle is in the aft position, the locking pin is in the released position and the only restraining force on the shoulder straps is the bungee spring. The straps may be locked by having the bungee in its retracted position and inserting the locking pin by placing the handle in the forward position.
(20) Cockpit Enclosure.
(b) Emergency Exit on Ground. - In case of a turnover on the ground, the kick-out panel on the left side of the canopy may be opened by pulling handle (figure 4) inward and aft which disengages the panel frame from the canopy frame and allows the panel to swing open. The canopy can also be opened from the outside by pulling the release handle outward and f forward.
(c) Emergency Exit During Flight. - Pull down on release tab located on the upper forward beam of the canopy.
(21) Parking Harness. - The control surfaces are locked by rigging the parking harness around the control stick. The short cables on the harness fasten into the eyes and the rudder pedal frame and the long cables fasten into the eyes on the pilot's seat frame. The parking harness is stowed in the fuselage baggage compartment.
(b). Power Plant Controls.
(2) Mixture Control. -On the right side of the pilot, on throttle quadrant,and has four positions: "IDLE CUTOFF","AUTO-LEAN", "AUTO-RICH", and "FULL RICH."
(b) To decrease engine power, adjust the throttle to obtain desired manifold pressure, and adjust the propeller control to obtain desired rpm. Readjust mixture control If necessary.
(3) Oil Dilution. - When a cold weather start is expected, the oil should be diluted before the engine is stopped. Operate the engine at about 1000 rpm and hold the oil dilution switch (figure 5) "ON" for about 4 minutes.
(4) Propeller Control. - Whenever the airplane is being operated, the safety switch (figure 5) should be "ON." When the switch opens due to overload, it may be reset by placing it in the "OFF" position and then returning it to the "ON" position. Propeller pitch may be changed independently of the rest of the propeller control system by holding the three-way toggle switch (figure 5) in either the "INC. RPM" or "DEC. RPM" position until the desired rpm is obtained. The automatic constant-speed control may be used by placing the switch in the "AUTO" position and setting the propeller governor control lever (figure 8) to the required rpm.
(5) Primer Control. - The primer (figure 5) must be turned counter clockwise to the "ON" position and pumped to prime the engine.
(6) Carburetor Heat Control. - This control (figure 6) operates a hinged vane in the carburetor air intake duct elbow and permits either warm air from the engine compartment or cold air from outside to enter the carburetor.